Thursday, November 18, 2010

Pattern in Pictures: Jellyfish!


Jellyfish amigurumi

This little guy is so easy to make. It takes barely any yarn and time to whip them up. I've made them with 5 tentacles but it's easy to add as many as you'd like. The length of the tentacles is also easy to change. Have fun and make sure to send me pictures of any you make at armyofowls@gmail.com

Materials:
  • less than 100 yds of yarn. Any weight or color would work fine.
  • H hook
  • yarn needle
Top:
Rnd 1: make a magic ring. work 6 sc in ring. (alternately, chain 2, work 6 sc in second ch from hook)

Rnd 2: 2sc in each sc around. (12 total)

Rnd 3: sc in first st. 2 sc in next st. repeat around. (18 sc total)

Rnd 4: sc in first 2 st. 2 sc in next st. repeat around. (24)

Rnd 5-9: sc around. (24 total)


Rnd 10: sl st in 1st st. ch 1, sk next stitch. 4 sc in next st. ch 1, sk next st. repeat around. Fasten off.


Tentacles:
ch 25. leave a long tail for sewing. (Make 5)

Assembly:
Turn jellyfish top inside out. Sew the tentacles as shown in the photo.


After all tentacles are sewn on turn jellyfish top right side out. You're done!

Attention Followers!

If you've made something from one of my patterns send me a picture of it. I'm putting together a post showcasing everyone who has. Send to armyofowls@gmail.com. Thanks in advance!

Thursday, August 26, 2010

Pattern in Pictures: Crochet Necklace

Please note: This pattern is NOT mine. You can find the designer's blog here.

Now, onto the festivities. :D


Materials:
  • small amount of worsted weight yarn. (I used sport yarn and a larger hook)
  • G hook (4 mm)
  • 1-2 buttons
  • yarn needle

Abbreviations Used:
  • ch=chain
  • sc= single crochet
  • sl st= slip stitch
  • dc=double crochet
Necklace:


Ch 77.


sc in second ch from hook and in following 3 ch


Ch 76.


Making sure the ch of 76 isn't twisted, sc in last 4 chains.


Ch 1, turn, sc in first 4 sc. Ch 80.


sc in last 4 sc.


Ch 1, turn, Ch 84. Sc in last 4 sc.


Ch 3, sl st to the opposite corner. This makes the buttonhole used to close the necklace.


Flower:

make a magic ring and ch 3 (counts as first dc) [altenately: ch 4 and do 9 dc in the 4th ch from the hook]


9 dc in magic ring sl st to the top of ch 3. (10 dc total)


Ch 1. In next stitch work 2 dc.


Ch 3, sl st in first ch. (Hey look at that, you made a picot!)


work 2 dc in same st.


ch 1, sl st in next stitch work [2 dc, picot, 2 dc in following st]

Repeat around. It should work out to look like the photo. 5 petals total. If you want more petals, just multiply the number of petals you want by 2. That's how many dc you should start out with in your magic ring. (Or ch 4!) Just remember the first ch 3 counts as one of the dc!

Now just sew a button onto the end of the necklace that doesn't have the ch 3 at the end. You can also sew a button to the middle of the flower, but it's not mandatory. Sew the flower onto the necklace whereever you'd like it.


This pattern is very easily adaptable. I have a really massive neck, so a lot of times I'll use a bigger hook or even ch more to begin with. All you really need to have it the 4 sc on either end to make the tabs you sew the button onto to close it. I have it on good authority that this also works as a headband. :D Be creative and as always, send any questions or pictures to me at armyofowls@gmail.com.

Sunday, May 30, 2010

S-s-s-Sunday Showcase!!!

This showcase is a twofer, and it's near and dear to me because these people are doing what I'd like to be doing with my life. They're both pattern designers but they design different things. They're both sincerely talented gals and you all should go buy things from them, if not patterns, then one of the things they've crafted.

I'm promoting these in the order in which I received the patterns they graciously let me test for free. First up is CarmenBee. I found her blog through Ravelry. She had been a featured designer for a really cute shrug she designed. (It's currently a work in progress).

She let me test the pattern for her Baby Hoodie. You can purchase it through her Etsy. It's an easy pattern and works up in a couple hours. It's probably faster if you haven't got a toddler to chase. :D I unfortunately don't have a baby around to model the hoodie, but I DO have a teddy bear. Hopefully he will suffice.
She also graciously answered some of my goofy, newbie blogger questions. These will hopefully be a staple of the Sunday Showcases to come.

How long have you been crocheting?
  • Over 2 years.
How long have you been designing patterns?
  • I probably started designing patters about 1 year ago, after I couldn’t find patterns for what I was “envisioning”!
How did you learn to crochet?
  • My mom suggested crochet after my failed attempt at knitting, since she found it easier. I am a “must see” person, so I took to you tube videos for every stitch and technique.
What is your favorite pattern that you've designed?
What pattern would you recommend to a beginner?
  • I guess just a scarf. It really helps you learn your tension and see how the size can change and you’ll see if you miss an end stitch or turning chain. Just pick a stitch like double crochet and go for as long as you’d like.
Thanks again for letting me test that pattern and for answering my questions. Everyone, go forth and buy some of her patterns! They're super easy to follow.


The second person in the showcase is someone I met through a crocheting thread I frequent on my favorite forums. :D She specializes in amigurumi and I'm glad she does. Her stuff is some of the most professional and cutest I've ever seen. Currently she's only got the pattern for a cat at her Etsy shop, but I'm hoping she'll post the patterns for some of the cute stuff she posts in the thread sometime soon.

She also was very gracious about the question answering. :D

How long have you been crocheting?
  • I began in August of 2009, so I've been crocheting for a little less than a year now. I originally started because I was an illustration student, but had nothing productive to occupy my time with when I wasn't drawing. I had never been good at crafts and I was tired of looking at cool things other people had done and immediately dismissing it like, "Oh, that's awesome, but I'd never be able to do that." I eventually realized that trying to crochet and failing at it was still better than sitting around and doing nothing, so I finally went for it.
How long have you been designing patterns?
  • I made my first pattern about four months ago when I signed up for the SA Secret Admirer exchange. My assignee said that he really liked cats, so that was how my kitty pattern came to be!
How did you learn to crochet?
  • I went out, bought some super saver yarn, picked up a couple of books and holed myself up in my room for a couple of nights. My first attempts at crochet were horrific mutated doilies: I kept making the same mistakes over and over and ended up with this huge pile of misshapen circles. I didn't know anyone else who crocheted, so when I needed help I watched youtube tutorials and drew little diagrams for myself. Youtube was my lifesaver. It took me about two weeks to finally get the hang of the basics.
What is your favorite project you've designed?
What pattern would you recommend to a beginner?
  • In terms of amigurumi, I would recommend any of the patterns from Ana Paula Rimoli's "Amigurumi World" book. They're basic enough for beginners and her instructions are very clear. The best thing about her and her patterns is that she has her own etsy (http://www.etsy.com/shop/anapaulaoli) and encourages people to email her if they have any questions. She's incredibly sweet and I think it's great that a published author takes the time to answer any questions anyone has about the patterns in her book. Knowing that made learning to crochet much less intimidating for me!

Go out and buy the cat pattern from her! Keep your fingers on the refresh button until she posts more patterns to buy, and then GO BUY THOSE! :D

More pattern posts to come. If you buy a pattern from these two, send me a picture at armyofowls@gmail.com of the finished product and I'll post them on the blog.

Saturday, May 29, 2010

Saturday Stitch in pictures! (Magic Ring and Invisible Decrease)

I'm going to attempt an explanation of the magic ring technique and the invisible decrease. Both are things I learned recently, and both have permanently replaced the usual methods I'd use to start amigurumi and decrease things before.

As always, video does a much better job at explaining this than I will. This is the magic ring video I like. This is the invisible decrease video I like. Youtube is one of the best resources for beginners. I've learned so much from how to videos on there.

I digress. I've made the first animal amigurumi pattern I've posted here larger than life. It's a play off of an octopus pattern on Lion Brand's website. Their pattern calls for a g hook and worsted weight yarn. I've bumped it up to an L hook and I held two strands of yarn together as I went. He ended up huge, and he's going to one of my all-time favorite people once he's 100% finished.

Giant Octopus Amigurumi

Materials:
L hook
worsted weight yarn
stitch marker
needle
small amount of black yarn


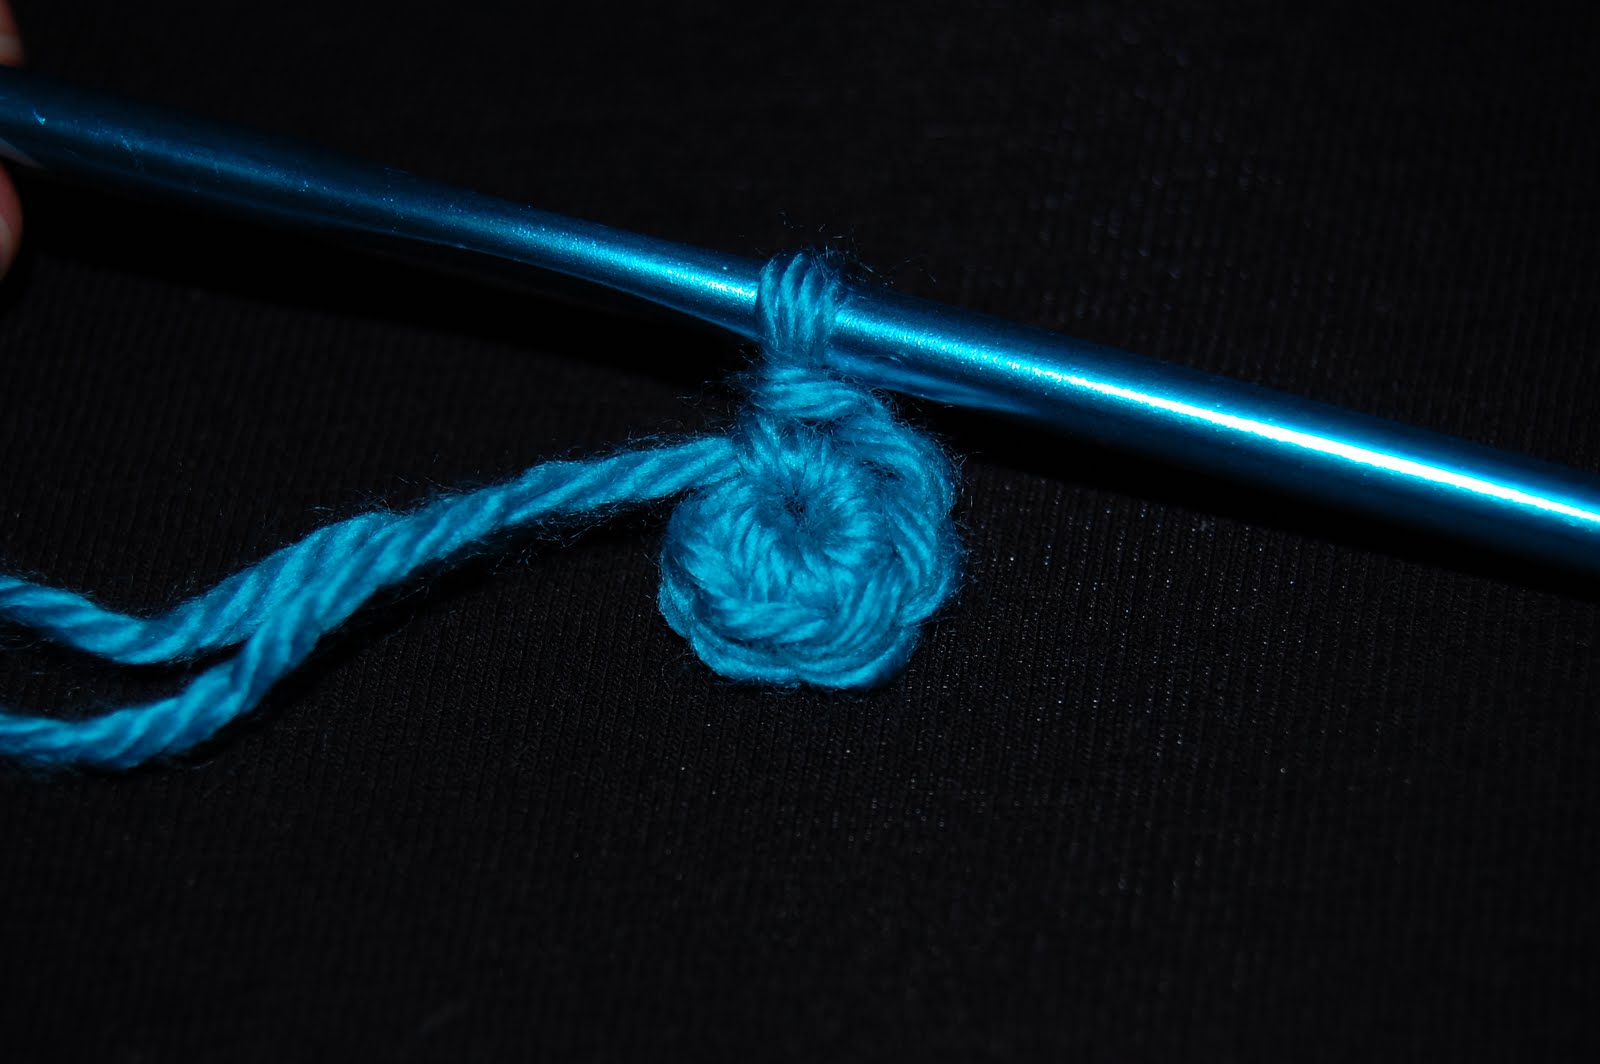
When starting a magic ring, keep the end of the yarn pointed at your palm. Wrap the yarn around your fingers, and cross the yarn over the end. Don't knot it.


I hold it at the point where the yarn crosses to steady it.


insert hook and pull up a loop.


ch 1. This will anchor the slipknot. Make sure it's not too tight and that you can still pull the circle closed or open.


sc around the tail of the yarn and the circle. Be careful not to let the end of the tail get covered by your sc. This particular pattern calls for 6sc.


Pull the tail of the yarn to make a circle. You can either cut the tail now, or just work it into your project by crocheting over it. You can also weave it in however you like to weave tails in. Now we're on to the octopus pattern. Even if you don't have sound available, watching the videos I linked at the top will help if you run into any snags.


Rnd 2: 2 sc in each sc. (12) *Mark first st of each round. Move marker up as you work.


Rnd 3: 2sc in next st, sc in following st. Repeat around. (18)


Rnd 4: 2sc in first st. sc in each of next 2 st, repeat around. (24)


Rnd 5: 2 sc, sc in next 3, repeat around. (30)


Rnd 6: 2sc, sc in next 4 st. repeat around. (36)


Rnd 7: 2sc, sc in next 5 st. Repeat around. (42)


Rnd 8-17: sc around. (42)


Invisible Decrease: insert hook into *front loop* of next st, then into the front loop of the following st. yarn over and pull through first two loops. Yarn over and pull through remaining two loops. Work Rnds 18-20 in this fashion: Inv. Dec, sc in next 5 (4 then 3 for rnd 19 then 20).


It should be starting to look like a head at this point. Find a spot and either embroider a face (what the black yarn is for) or use whatever size safety eyes you'd like. Stuff the head, but leave some room to continue closing up the head. Work Rnds 21-23 the same way, with an Inv Dec and a decreasing amount of stitches between Inv Dec. Rnd 23 should be an entire rnd of Inv. Dec.
*Stuff head to satisfaction before sewing hole closed*


I made an angry Octopus.


Start the legs the same way you started the head. (6sc in magic ring)


Rnd 2: 2sc in each st around. (12)


Rnd 3-10: sc in each st around. (12)


Lightly stuff and sew closed.


Sew to head. Repeat 7 more times. :D

Hopefully these pictures helped. As always, send pics of finished projects to me at armyofowls@gmail.com.